Creating A Web Application Project Using Command line (.NET CLI)
Creating A Web Application Project Using Command-line (.NET CLI)
This tutorial shows step-by-step instructions to create an ASP.NET Core Web Application Project with individual user authentication.
I use the Windows Power Shell command interface for this tutorial.
At the time of writing this tutorial latest available .NET Core version is 6, while Visual Studio 2022 community is the latest available version. But I wanted to use and test an older application and custom template build using ASP.NET Core 2.2 and Visual Studio 2017. And I wanted to create several test projects but the old custom templates didn't work. And also most of the Microsoft documentation is changed, updated, or outdated. So most latest documents are based on the dotnet new command line. So I wanted to dig into the dotnet CLI. I know that this will be useful for me again later time or it will be useful to someone else.
Create directories
PS D:\dev\dotcli> mkdir myTmpBox\templates
PS D:\dev\dotcli> dir mytmpbox

List installed dotnet versions
PS D:\dev\dotcli> dotnet --list-sdks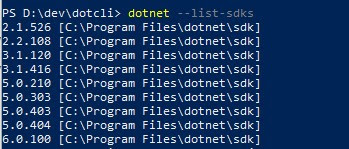

Working on an older version
We need to switch to the older version. we can just make the working root folder work on the older version by using the command globaljson .
PS D:\dev\dotcli> dotnet new globaljson --sdk-version 2.2.108 --forceglobaljson, there is no dot before json. After executing the command it will generate a file named global.json. Create A New Razor Web App Project With Individual User Accounts
PS D:\dev\dotcli\MyTmpBox\templates> dotnet new webapp --name RPWebApp1 --auth Individual
Create A Solution File
The project is created but there is no solution file. We have to create a new solution file.
PS D:\dev\dotcli\MyTmpBox\templates> dotnet new sln --name Razor22Then add the previously created project to the new solution
PS D:\dev\dotcli\MyTmpBox\templates> dotnet sln add RPWebApp1\RPWebApp1.csproj
Now we have created an ASP.NET Core 2.2 Razor Page web application using dotnet template engine command-line tools.

Sqlite database. If we create a project with individual user accounts (ASP.NET Core Identity) in Visual Studio 2017 it will use MS SQL Server local Db instead Sqlite. 
Conclusion
In this tutorial, we learn how to create a Web Application using dotnet new template engine as well as several other important commands like globaljson and sln .


Comments
Post a Comment