Creating Visual Studio Custom Templates for ASP.NET Core Razor Pages

Create Visual Studio Custom Project Templates for ASP.NET Core Razor Pages Web Application


Traditionally Visual Studio comes with several default templates. There are two types of templates: Project templates, and item templates. Using those templates we build more complete projects for our own business use. Sometimes we want to create more specific types of templates. For example, if we have a customized project and we want to use it to create projects more often, Visual Studio provides a way to store them as a template and reuse them when creating a project. 

Apart from this now with the new Dotnet core, there is a new set of templates available for Visual Studio. .Net core templates can be used either by Visual Studio  & Visual Studio for Mac or the dotnet command line (dot net new).

Dotnet core templates are introduced in Visual Studio 2017. Here I am documenting how to create custom .core web app project templates for VS2017. 

DotNet Core Web App Project Template for 2017

Things you need :

A copy of the fully customised project.

Take a screenshot of the running application, so that we can use it for the preview image for the project. It will show in the "New Project" window of the template wizard. and save it as a picture file, for example; PreviewImage.jpg. 

A .ico file for the project to display in the "New ASP.NET Core Web Application" window.


Figure 1.


Summary

This guide shows how to create a Visual Studio Project template for ASP.NET Core  Web Application. It consists of two parts. Fist part creates the NuGet package and then creates a Visual Studio Extension Project (VSIX)  to deploy the project to install into the computer.

These files will be configured, created or generated during this guide:

  • template.json
  • vs-2017.3.host.json
  • .nuspec file (RazorTemplate.nuspec)
  • .nupkg file (RazorTemplate.DACompany.1.1.0.nupkg)
  • template.pkgdef
  • source.extension.vsixmanifest
  • .vsix file (RazorTemplate.vsix)


I will use the project created in the Getting Started With Web application using ASP.NET Core 2.2 in the Visual Studio 2017 guide.

Step 1: Open a new Visual Studio 2017 instance, select Create a new Project


Figure 2.


Step 2: Then select the VSIX Project template found under the Extensibility node at the left.


Figure 3.


Then give a project name and a solution name, then click OK to create the project. The wizard will create the project in the solution. Open the folder from Windows Explorer (leave the Visual Studio in the background), it will look like this:


Figure 4.

Step 3: Now we need to add a copy of your custom project to this (Core2XTemplates) folder. Your custom project might be just a standard website without user Authentication, or a complex project with user authentication. 

Beyond this point, for explanation purposes say your project is named MyCustomProject1 

Preparing the project for the Template

   
Since this is a Razor page Template you have 2 options, one is simple but not flexible other is complex and flexible.

  1. You can use your existing custom project, MyCustomProject1. But it will not fit the wizard's "New ASP.NET Core Web Application" window options.  For example, if the MyCustomProject1 does not have user authentication, when using this project template, even if the user selects the "Change Authentication" button to add individual user authentication, the final project created by your template does not add a user authentication feature to it.

    Also if the MyCustomProject1 does have user authentication and when using this project template, even if the user didn't press the "Change Authentication" button and left it as "No Authentication" the final project created by your template adds a user authentication feature related to code to it. Therefore you don't need to use this feature. Instead, you can use the Export Template option from the Visual Studio IDE.

  2. You get the original source code from the dotnetcore   GitHub repository and make changes to either your custom project MyCustomProject1 or make changes to the downloaded code. It will not be a big task, and it will give users full wizard functionality in the "New ASP.NET Core Web Application" window options.
Beyond this point, for explanation purposes say unzipped source code folder is named as RazorPagesWeb-CSharp. 

This second option can be done in two ways:
  • Method-1: Make changes to  MyCustomProject1 based on the source code project
  • Method-2: Make changes to the source code project based on MyCustomProject1
Choose the one that best matches your requirements.

I am going to explain the second option and show you both Methods. 

Step 4: 


ASP.NET Core source is available on GitHub, but it is a huge download, and not practical to download. What we need here is a template pack for ASP.NET Core Razor Pages Web Application, in our case for this tutorial the base version we want is version 2.2. So the available last release for this project is version 2.2.13 and it can be accessed from this address:


But how can we download only a folder (or part of the source), there is no option on the GitHub website to download a folder. Follow this guide Download a single folder or directory from a BRANCH in GitHub repo to download the folder. 

Once you download the template source, unzip it to a folder named RazorPagesWeb-CSharp inside the main solution folder. If you follow this far solution folder is Core2XTemplates.

And make sure that it is also located inside the Core2XTemplates solution folder. Altogether there should be 3 project folders inside it.

Keep in mind that RazorPagesWeb-CSharp uses Company.WebApplication1 as the namespace for the project. At the end of the copying process, we need to fix those namespaces as well. In my case, it was easier to follow the second method described below.


Method-1: Make changes to the custom project based on the source code project

DO NOT copy any files inside wwwroot of the RazorPagesWeb-CSharp to MyCustomProject1. All the UI changes done in the custom project will go to the final template project. 

If your custom project MyCustomProject1 does NOT have user authentication then:
  • Copy .template.config, Areas folder, Data folder and app.db file from the source code RazorPagesWeb-CSharp to MyCustomProject1 root folder.
  • Copy Pages/Shared/_LoginPartial.Identity.cshtml and Pages/Shared/_LoginPartial.OrgAuth.cshtml found in  source code RazorPagesWeb-CSharp to your MyCustomProject1's Pages/Shared folder.
If your custom project MyCustomProject1 does have user authentication then:
  • Compare MyCustomProject1s folder structure with downloaded RazorPagesWeb-CSharp folder structure using Windows Explorer and add all extra or missing files and folders from RazorPagesWeb-CSharp to  MyCustomProject1. DO NOT replace any folder or file.

Comparing the files


Now use Visual Studio IDE to complete the following task.

If MyCustomProject1 does have user authentication then, after copying files there should be 3  _LoginPartial files inside Pages/Shared/ folder.
    Pages/Shared/_LoginPartial.cshtml
    Pages/Shared/_LoginPartial.OrgAuth.cshtml 
    Pages/Shared/_LoginPartial.OrgAuth.cshtml
 
If you make any changes to Pages/Shared/_LoginPartial.cshtml before comparing it with the other 2, _LoginPartial files and add those changes to both files. Then remove only the Pages/Shared/_LoginPartial.cshtml from the project. 

Compare all the code files in RazorPagesWeb-CSharp with MyCustomProject1 and add missing code to MyCustomProject1. Basically, only a few files to change.

As an example, if we look at the _Layout.cshtml file in RazorPagesWeb-CSharp project it has a green-coloured code block similar to a comment, we need to include that part in _Layout.cshtml file in MyCustomProject1 as well. 

Add that code block 

@*#if (IndividualAuth || OrganizationalAuth)
                 <partial name="_LoginPartial" />
  #elseif (WindowsAuth)
                 <p class="nav navbar-text navbar-right">Hello, @User.Identity.Name!</p>
  #endif*@
    
below the
<div class="navbar-collapse collapse d-sm-inline-flex flex-sm-row-reverse" >
element, so the file would look like this:

    <header>
        <nav class="navbar navbar-expand-sm navbar-toggleable-sm navbar-light bg-white border-bottom box-shadow mb-3">
            <div class="container">
                <a class="navbar-brand" asp-area="" asp-page="/Index">Company.WebApplication1</a>
                <button class="navbar-toggler" type="button" data-toggle="collapse" data-target=".navbar-collapse" aria-controls="navbarSupportedContent"
                        aria-expanded="false" aria-label="Toggle navigation">
                    <span class="navbar-toggler-icon"></span>
                </button>
                <div class="navbar-collapse collapse d-sm-inline-flex flex-sm-row-reverse">
    @*#if (IndividualAuth || OrganizationalAuth)
                    <partial name="_LoginPartial" />
    #elseif (WindowsAuth)
                    <p class="nav navbar-text navbar-right">Hello, @User.Identity.Name!</p>
    #endif*@
                    <ul class="navbar-nav flex-grow-1">
                        <li class="nav-item">
                            <a class="nav-link text-dark" asp-area="" asp-page="/Index">Home</a>
                        </li>
                        <li class="nav-item">
                            <a class="nav-link text-dark" asp-area="" asp-page="/Privacy">Privacy</a>
                        </li>
                    </ul>
                </div>
            </div>
        </nav>
    </header>
Now you might get an idea of what to do. If any of the custom code files in MyCustomProject1 contains code to include this partial view _LoginPartial then you need to change it as well with the above code block. 

let's see another file _ViewImports.cshtml. 

            @*#if (IndividualLocalAuth)
            @using Microsoft.AspNetCore.Identity
            #endif*@
            @using Company.WebApplication1
            @*#if (IndividualLocalAuth)
            @using Company.WebApplication1.Data
            #endif*@
            @namespace Company.WebApplication1.Pages
            @addTagHelper *, Microsoft.AspNetCore.Mvc.TagHelpers
		
	
Note the #if conditions. Similarly, if any of the custom files contain any reference to "Microsoft.AspNetCore.Identity" then you have to include the conditions there as well.  Also if it has a reference to the Data folder it needs similar checking.

There a 2 more important files to check against the RazorPagesWeb-CSharp. Similarly, make necessary changes to the following files:
    
    appsettings.json
    Startup.cs

Method-2: Make changes to the source code project based on your custom project 

  • Compare MyCustomProject1s folder structure with downloaded RazorPagesWeb-CSharp folder structure using Windows Explorer and add all extra files and folders from MyCustomProject1 to source code RazorPagesWeb-CSharp. DO NOT replace any folder or file. 
  • Delete the wwwroot folder located inside RazorPagesWeb-CSharp.
  • Copy the entire wwwroot folder from MyCustomProject1 and paste it to the root of the RazorPagesWeb-CSharp. 
Now use Visual Studio IDE to complete the following task.

Compare all existing files in MyCustomProject1 against the matching files in the RazorPagesWeb-CSharp project. Only a few files to check.

Also if skipped the Comparing the files section above just read through it to get an idea of a necessary amendment to RazorPagesWeb-CSharp.  

As I mentioned before RazorPagesWeb-CSharp use Company.WebApplication1   as the namespace. So change all MyCustomProject1 namespace lines in code just copied to Company.WebApplication1 as well. (You can do the opposite if you like, but for this guide, I will use the same Company.WebApplication1 later as well !)  

Step 5: 


 If you try to compile this RazorPagesWeb-CSharp it will show "Duplicate 'DbContext' attribute" and  "Duplicate 'Migration' attribute" errors with 3 other error messages. This is fine, It comes because the source code project contains SqlServer and SqlLite under the Data folder. 

To confirm that first, we need to exclude the SqlLite folder from the Project.

Right-click on the SqlLite folder in the Solution Explorer and select "Exclude from Project" from the context menu. Then rebuild the project. Make sure that there are no more errors.

Now again include the SqlLite folder and exclude the SqlServer folder from the project. Rebuild the project, there should be no more errors.

After all, is fixed again include the SqlServer folder, so both folders are now included in the template project. Do not compile the project.

Configuring Template

Step 6: Setting up the JSON  configuration files

Now we need to configure the required template parameters. The folder .template.config in the root of the project folder, as the name suggests,  contains the configuration files required for the template. The folder is not related to the application, therefore it is not included in the Visual Studio project. If the "Show All Files" button in the Solution Explorer toolbar is not selected, then this folder will not be visible. Just click on it, and it will appear on Solution Explorer. Alternatively, you can check it from Windows Explorer.

There are 3 .json files and a folder inside this folder.  We are going to change only 2 files:
  • template.json
  • vs-2017.3.host.json
The child folder "vs-2017.3" contains the icon required for the "New ASP.NET Core Web Application" window shown in figure 5, marked as number 1. We can safely delete and put the icon inside the .template.config folder.


Figure 5

I will use the above figure to explain some descriptive parameters in the two .json files we are going to configure.

template.json

The following parameters need to be changed:


"author": "Microsoft",
"name": "ASP.NET Core Web App",
"description": "A project template for creating an ASP.NET Core application with example ASP.NET Razor Pages content",
"groupIdentity": "Microsoft.Web.RazorPages",
 "identity": "Microsoft.Web.RazorPages.CSharp.2.2",
  "shortName": [
    "webapp",
    "razor"
  ],
"sourceName": "Company.WebApplication1",


for example, I will change them as follow:


"author": "DACompany",
"name": "ASP.NET Core 2.2 - Razor Pages Web App",
"description": "A project template for creating an ASP.NET Core application with additional example ASP.NET Razor Pages content",
"groupIdentity": "DACompany.Web.RazorPages",
 "identity": "DACompany.Web.RazorPages.CSharp.2.2",
  "shortName": [
    "rzp22",
    "rzp22webapp"
  ],
"sourceName": "Company.WebApplication1",


For the UI shown in figure 5, only the author's property value from this file will appear in the number 3, marked box area.
Other parameters are required for the template engine, so remember to give relevant values.
Remember to give unique names for name, Identity, groupIdentity and shortName parameters. 

vs-2017.3.host.json

The following parameters need to be changed:


"name": {
    "text": "Web Application",
    "package": "{0CD94836-1526-4E85-87D3-FB5274C5AFC9}",
    "id": "1017"
  },
  "description": {
    "text": "A project template for creating an ASP.NET Core application with example ASP.NET Razor Pages content.",
    "package": "{0CD94836-1526-4E85-87D3-FB5274C5AFC9}",
    "id": "1018"
  },
  "order": 300,
  "icon": "vs-2017.3/WebApplication.png",
  "learnMoreLink": "https://go.microsoft.com/fwlink/?LinkID=784881",


for example, I will change them as follow:

"name": {
    "text": "Core 2.2 Razor Pages Web Application",
    "package": "{0CD94836-1526-4E85-87D3-FB5274C5AFC8}",
    "id": "221017"
  },
  "description": {
    "text": "A project template for creating an ASP.NET Core 2.2 web application with extra example ASP.NET Razor Pages content.",
    "package": "{0CD94836-1526-4E85-87D3-FB5274C5AFC8}",
    "id": "221018"
  },
  "order": 300,
  "icon": "vs-2017.3/icon.ico",
  "learnMoreLink": "https://docs.ourwebsite.com/fwlink/?LinkID=784881",

The value of the text property in the name node will appear in the no 1 marked in the figure below

For the UI shown in figure 5, 
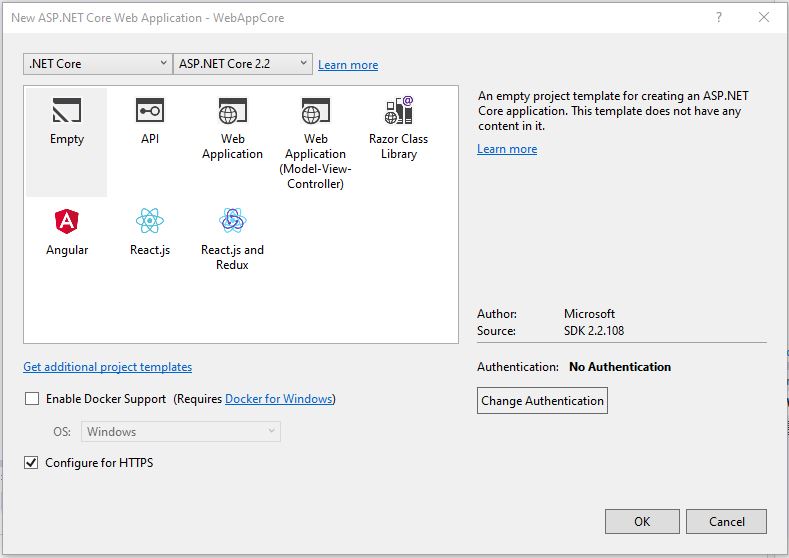
  • the name: text property value from this file will appear in the number 1, marked box area.
  • the description: text property value from this file will appear in the number 2, marked box area.
  • the icon property value from this file will show the icon in the number 1, marked box area

Step 7. Creating NuGet specification ( .nuspec) file


Use Windows Explorer to open the RazorTemplate folder and then type CMD in the folder path textbox to open the command prompt. And then type:

nuget spec

and press enter, It will generate the RazorTemplate.nuspec inside the root folder. Open the file using Visual Studio ( or Note Pad ++). 

<?xml version="1.0" encoding="utf-8"?>
<package >
  <metadata>
    <id>$id$</id>
    <version>$version$</version>
    <title>$title$</title>
    <authors>$author$</authors>
    <requireLicenseAcceptance>false</requireLicenseAcceptance>
    <license type="expression">MIT</license>
    <!-- <icon>icon.png</icon> -->
    <projectUrl>http://project_url_here_or_delete_this_line/</projectUrl>
    <description>$description$</description>
    <releaseNotes>Summary of changes made in this release of the package.</releaseNotes>
    <copyright>$copyright$</copyright>
    <tags>Tag1 Tag2</tags>
  </metadata>
</package>


Here, parameters surrounded by $ must be replaced by proper values for this scenario.
Now change the necessary values. Follow this example as a guide:


<?xml version="1.0" encoding="utf-8"?>
<package >
  <metadata>
    <id>RazorTemplate.DACompany</id>
    <version>1.1</version>
    <title>ASP.NET Core 2.2 Razor Web Templates package </title>
    <authors>DACompany</authors>
    <requireLicenseAcceptance>false</requireLicenseAcceptance>
    <license type="expression">MIT</license>
    <icon>template.png</icon> 
   
    <description>New custom project template 2.2</description>
    <releaseNotes>This provide additional Razor page template.</releaseNotes>
    <copyright>$copyright$ 2018 DACompany</copyright>
    <tags>asp.net-core-2.1 asp.net-core-2.2 Razor</tags>
  </metadata>

  <files>
	<file src="template.png" target="" />
        <file src="..\Company.WebApplication1\**\*.*" exclude="**\bin\**\*;**\obj\**\*;**\launchSettings.json;**/*.user" target="content\RazorPages.App22" />
  </files>
</package>


Step 8. Generating the Nuget package (.nupkg ) file


Save the file and go back to the command prompt and type:


    nuget pack RazorTemplate.nuspec


The RazorTemplate is the folder and the project name I used. If your project and the folder name are different, replace this with that name. Then, press Enter key, and it will create a .nupkg file. For example,  RazorTemplate.DACompany.1.1.0.nupkg  

Step 9.  Create template.pkgdef file

In Microsoft documentation it says this:


The preferred way to register packages in Visual Studio is by using .pkgdef files. This allows for extension deployment without having to access the system registry, which is a requirement for VSIX deployment. Pkgdef files are created by using the CreatePkgDef Utility.


For this ASP.NET Core Templates we do not need to use this  CreatePkgDefUtility, just create a text file in the root of the RazorTemplate project folder and rename it as .pkgdef.  

All you need to type the following lines


[$RootKey$\TemplateEngine\Templates\RazorPageTemplate\1.1]
"InstalledPath"="$PackageFolder$"


Later in the next step, we will add this as an asset in to the vsix configuration file.

The template can be installed without this file,  but if it is not available, then the source field in the Wizard window will be a long path name. If we add this .pkgdef file it shows the Product Name given in the source.extension.vsixmanifest file (refer to number 1, marked box area in the below figure 6). I am not sure why MS developers don't just use the same product name to display this without using .pkgdef.
This file will be added to the VSIX project as an asset to the file source.extension.vsixmanifest

Step 10. Configuring the VSIX project


Use the Visual Studio IDE to open the source.extension.vsixmanifest file to open it. Fill in the appropriate text boxes.  Note that the product name you give here as shown in the number1, marked text box area in the figure 6 below, will appear in the "New ASP.NET Core Web Application" wizard window as shown in the number 4, marked box area in the above figure 5.

Here is an example.


Figure 6


Next click on the "Assets" tab:
  • Add new asset .nupkg file:
    Click on the "New" tab to add a new asset. For the type, field give a type such as DACompay.RazorTemplate.NugetPackage,  then for the source select, the file system, then use the browse button to locate the .nupkg file. In this guide, it is RazorTemplate.DACompany.1.1.0.nupkg file.
  • Add new asset .pkgdef file:
    Click on the "New" tab to add a new asset. For the type field select Microsoft.VisualStudio.VsPackage from the drop-down,  then for the source select, the file system, then use the browse button to locate the .pkgdef file. In this guide, it is template.pkgdef file.
Save the file. Once both assets are added it will look like this in the IDE


Figure 7


Step 11. Generate the VSIX file.


Make sure that the project is set to release mode as shown in number 2 above figure 6. Then select the RazorTemplate project from the solution explorer and then right-click, then "Build" from the context menu. This will generate the RazorTemplate.vsix under the bin\Release folder. Check it from Windows Explorer.

Now double click the file and follow the instructions to install it in to the computer. If the Visual Studio is opened you need to close it to complete the vsix installation. Once it is done re-open the Visual Studio and click Tools in the menu bar and then select "Extensions and Updates". If the installation is successful it should appear in the installed list in the "Extensions and Updates" Window.


Figure 8

Step 12. Use the newly created custom template.


Now create a new project, select ASP.NET Core  Web Application and give a project name, location and solution name, then click next. It will show the "New ASP.NET Core Web Application" wizard window as shown  in the above figure 5. And then select the new project template created. Also click on the Change Authentication button to select the "Individual User Accounts" option the Click OK and again OK for the next window. It should create the new project with the custom template.

This concludes the Tutorial. 

Core 3.1 and VS 2019.


Next tutorial I will show the changes required to create ASP.NET Core 3.1 Razor Pages Web Application template in Visual Studio 2019. 

Reference


Full template pack solution:

Full site link( DO NOT Down Load!)


Comments

Popular posts from this blog

Examining the Project structure - ASP.NET Core 7 Part 4

Getting Familiar with Visual Studio 2022 IDE - ASP.NET Core 7 Part 3

Displaying A Start Page In ASP.NET Core 3.1 Web API Project.